BEDROOM FIRE
- Layla Newton

- Sep 10, 2021
- 2 min read


Adding a bit of faux character to my 1960s bungalow!
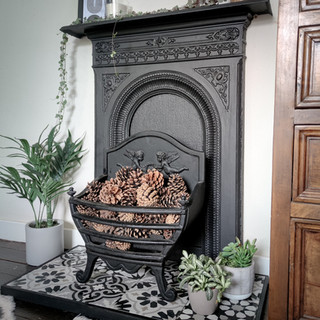
I love these little bedroom cast iron fireplaces so I just had to have one to fill this bit of empty space in the bedroom. I already had the fire and it was looking a bit sad without a hearth and surround. I picked up the surround from Facebook marketplace and built the hearth using spare strip wood and tiles that I had. Oh and the paint is my trusty Frenchic blackjack 😉
Things you will need:
Sand paper
Sander (optional)
Wood filler
Hand saw
Screws
Wood glue
Fire surround
Fire (optional depending on the surround)
Stripwood
Paint - suitable for metal
Tiles
How to:
First of all you need to sand back any loose paint and rough edges on your surround and fire. I used a coarse grit and where the paint was really thick I scraped it off with a hammer and chisel. It's cast iron so you can be a bit rough with it.
Next wash it down. I use soapy water then dry it off, but you can use white spirit.
Paint the surround and/or fire using a brush, then a roller to smooth over the flat surfaces to give an even finish.
Whilst that is drying, it's time to create your hearth. I laid my tiles upside down and then built a frame around them so they fit snug. I lined up the top of the sides with the top of the tiles to give a flush finish. The base of the frame is screwed together. The four outer edges are glued so as to create a neater finish.
Once that's done it should be time to paint your second coat.
After the glue is dry on your hearth frame, sand back any rough edges. Also use wood filler if necessary to fill any gaps on the 4 corners.
Paint the hearth frame.
Once all the paint is dry, you can put the hearth in its location and add the tiles.
Put the surround on top and mark out where you need to drill holes for the screws.
Drill and plug those holes.
You may also need to remove some of your skirting to help the surround fit flat onto your wall.
Fit the surround to the wall.
Now you just need to put the fire onto your hearth too and decorate as you please.


Comments