CREATE YOUR OWN BATHROOM VANITY
- Layla Newton

- Jul 11, 2021
- 5 min read
Save yourself a fortune and create your own bathroom vanity sink

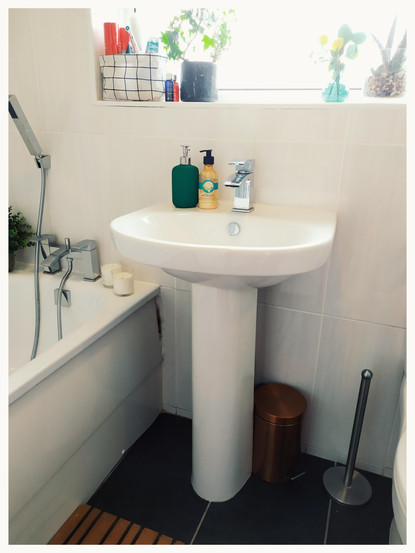
For a while I've been wondering what to do with this pedestal sink of mine. My problem was that the bathroom is small and I have a lot of things that need stored in here. I had a tall unit but in such a small space it was really making the bathroom feel even smaller so I knew I needed vanity storage.
After seeing people creating vanities out of cupboards on Instagram, I decided to create one of my own. I had an old hifi unit that I decided to use this as my base. I bought a round counter top sink from eBay. I have no plumbing experience so I was learning how I went so even if you have little to no experience then you could do this too. Below is how I did this. You may decide to do it differently and your own project will be unique to you depending on what you want to achieve. Also, I am in no way an experienced plumber so you may find an easier way than the below. However, I hope reading how I did this will give you the confidence and some pointers on how to do it yourself :)
You will need:
Cupboard
Counter top sink
New taps (or old ones if using those)
New waste
Paint
Varnish/Wax
Paint brushes
Wax brush or cloth if using wax
Orbital sander
Sanding paper - 60 or 80 grit and a finer 120 or 240 grit
Clear silicone
Tap connectors
Drill
Holesaw kit
Hand saw
Wall plugs and screws
Stud finder
Compression flexible waste tube 32mm
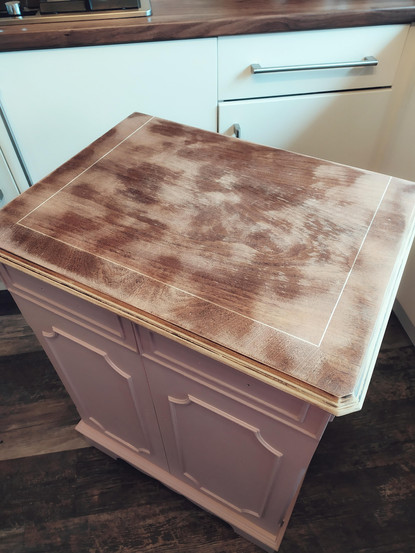
First you need to prepare your chosen cupboard. Mine was full of old paint. Luckily this meant that as soon as I took the sander to it, it just all peeled off. Use a rough sand paper first and then a finer sand paper to give a smooth finish, especially on the top of the vanity. Make sure you have a smooth finish as if you paint over flaked paint you will just end up with a patchy finish. If your paint is not flaky then a quick fine sand is all you will need to create a surface for the new paint to stick to.
Now you have sanded, give it a clean. Some people use white spirits but I hate the smell of this so I just used soapy water then left it to dry.
Time to paint! I used Frenchic Dusky Blush Alfresco paint which does not need a primer which makes life a bit easier. I then used a medium oak varnish for the top. I used a few coats of varnish to get rid of the patchy look.
Once dry, it is time to remove the pedestal sink from the wall. This is actually quite easy. First turn the water off at your stopcock and run the taps to get rid of excess water.
Cut around the sealant between the vanity and the wall.
Disconnect the taps and the waste by the u-bend.
There are 2 large bolts attaching the sink to the wall. Unscrew these with a spanner.
Now you need help from someone else. One of you will need to lift the sink off the wall, while the other holds the pedestal. The pedestal is lose so if you don't do this it will all fall over. The sink is also very heavy.
Remove the old bolts from the wall using a spanner.
I wanted to reuse my taps so my other half removed these from the sink using a spanner while I did the next step.
You now need to cut holes in the back of the unit to make room for your pipes. I measured where my pipes were so I knew exactly how much I needed to cut out. I used a holesaw attached to my drill to mark out the furthest points and then a handsaw to cut out the rest from there.
Work out where you are going to attach the vanity to the wall. Use a stud finder for this, especially if your pipework is in the walls. A big clue of where to drill is where the bolts are in place for the old sink. Drill a hole or two into the wall (if drilling into tiles use masking tape to stop your drill slipping). Don't forget to put plugs into the wall now.
Put your vanity in place.
Now time to cut the holes in the top of the vanity. Pop your sink in position and use a pen to mark out where the hole for the waste needs to go and the tap. Bear in mind where your pipes are when you do this. You really need a holesaw for this part, especially if you are having a round counter top sink. Make sure you get one that can cope with hardwood, as you'll be there forever with a softwood one. I picked a kit up from Amazon for £10. It wasn't brilliant but it got the job done.
Now the holes are in, connect the tap using flexible tap connectors. I had to buy extra ones as the counter top vanity sits higher than a pedestal sink. I also took my tap into B&Q to make sure I was buying the right ones. See 4th pic for the height difference.
Pop the sink on top and put the new waste in your sink and make sure everything lines up.
I then attached the u-bend to the waste. Now because of the height different I also needed a Compression flexible waste tube 32mm - this size is for vanities. Use this for between the pipes connected to your wall and the u-bend.
Turn the water on.
Run the water and make sure everything runs fine and that you have the hot and cold connectors matched up correctly.
Now all your pipes line up, disconnect the sink from the top and the waste. I didn't need to disconnect the taps from the mains to do this. Use clear silicone around the bottom of the sink hole and attach it to the vanity. Then put silicone around the top of the sink hole and attach the waste to the sink.
Screw the waste to the sink underneath the vanity, making sure not to disturb the silicone too much.
Attached the u-bend.
I needed to seal the gap around the outer of my sink and the back of the vanity also.
Now leave for 24 hours. It may say can be used after 30 mins, but really just leave it to make sure it is dry.
Now time to do the shelves. Line them up and measure where you need to cut and once cut slot the shelves in.
Now you are all done!


Comments